Radio button options allow customers to select exactly one choice from multiple options. Perfect for size selection, style choices, and any scenario where customers must pick a single option from a set of mutually exclusive choices.
What Are Radio Button Options?
Radio buttons create a set of options where customers can select only one choice at a time. When a customer clicks a different option, the previous selection is automatically deselected. This makes radio buttons ideal for exclusive choices where only one answer is possible.
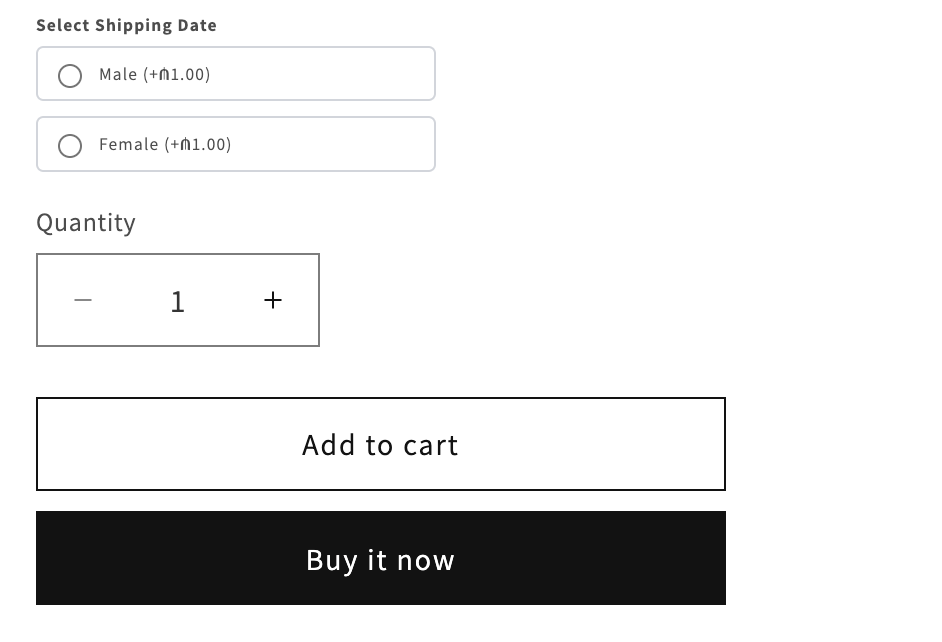 Radio button options for gender selection with pricing displayed on product page
Real-World Use Cases
1. Product Variants
Size Selection
Label: "Select Size"
Options: Small, Medium, Large, X-Large
Default: Medium
Pricing: +$5 for X-Large
Gender/Fit Selection
Label: "Select Fit"
Options: Men's, Women's, Unisex
Pricing: Different pricing by fit
2. Style Choices
Design Style
Label: "Choose Style"
Options: Classic, Modern, Vintage, Minimalist
Default: Classic
Color Finish
Label: "Finish"
Options: Matte, Glossy, Satin
Pricing: +$10 for Glossy finish
3. Service Options
Shipping Speed
Label: "Shipping Method"
Options: Standard (5-7 days), Express (2-3 days), Overnight
Pricing: Standard (Free), Express (+$10), Overnight (+$25)
Default: Standard
Gift Wrapping
Label: "Gift Wrapping"
Options: No Thank You, Standard ($5), Premium ($15)
Default: No Thank You
4. Configuration Choices
Engraving Location
Label: "Where should we engrave?"
Options: Front, Back, Inside
Paper Type
Label: "Paper Quality"
Options: Standard, Premium, Luxury
Pricing: Premium (+$5), Luxury (+$15)
Creating Radio Button Options
Step 1: Basic Setup
- Click Create New Option
- Select Radio option type
- Enter option details:
Option Label: "Select Shipping Date"
Internal Name: "shipping-date"
Help Text: "Choose your preferred shipping speed"
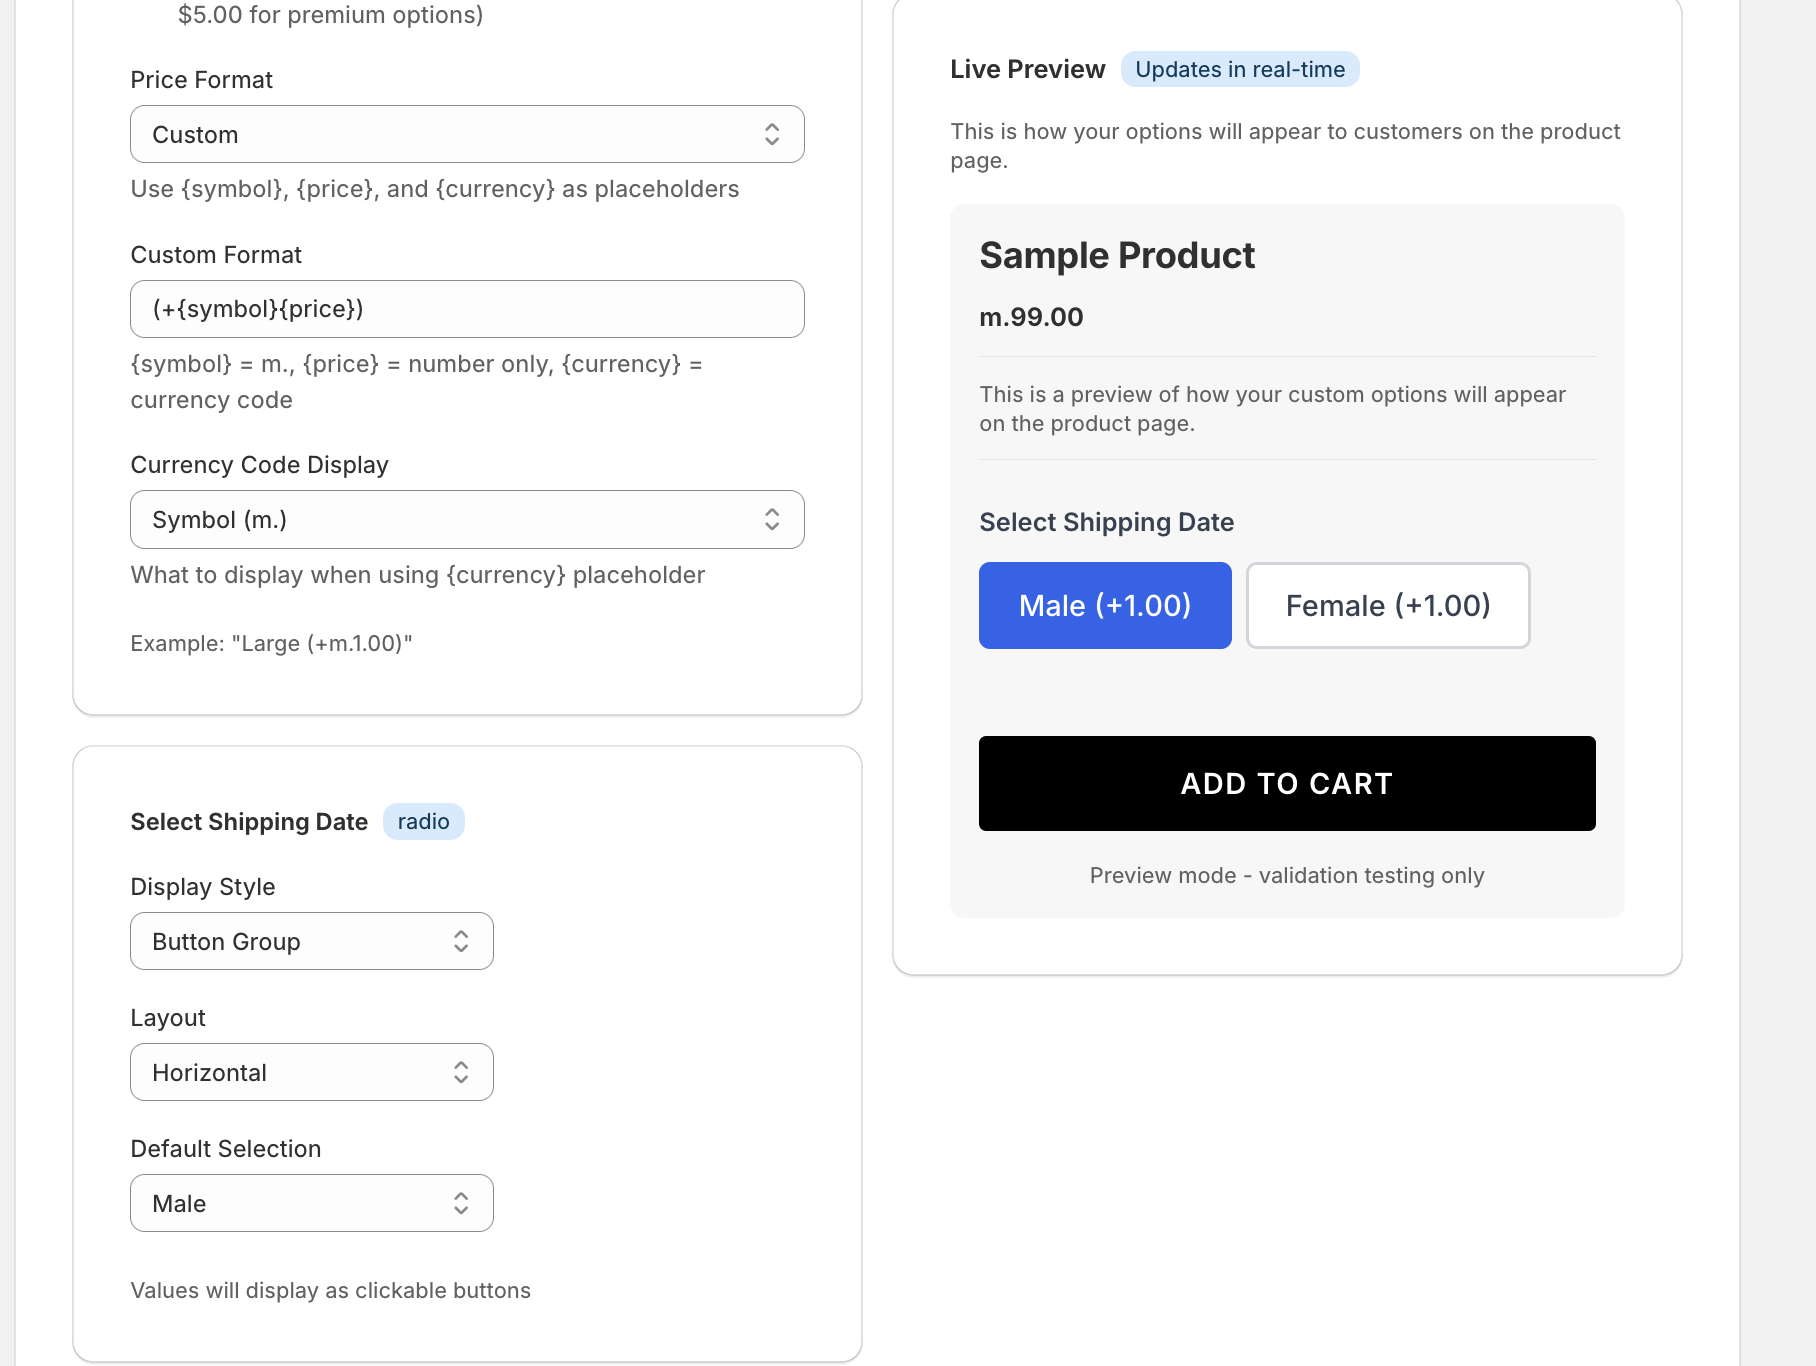 Configure radio button display style, layout, default selection, and pricing
Step 2: Add Option Values
Add the choices customers can select from:
Value 1: Standard Shipping
Value 2: Express Shipping
Value 3: Overnight Shipping
Tips for option values:
- Use clear, descriptive names
- Keep them concise (2-4 words ideal)
- Make differences obvious
- Include key information (timing, features)
Step 3: Configure Display Settings
Display Style
Choose how radio buttons appear:
Button Group (Recommended)
- Modern, clickable buttons
- Clear visual selection
- Better mobile experience
- Professional appearance
- Shows pricing inline
Traditional Radio Buttons
- Classic circular selectors
- Familiar interface
- Compact display
- Good for long lists
The Button Group style shown in the screenshot provides a clean, modern look that works well with pricing display.
Layout Options
Horizontal Layout
Display: Side by side
Best for: 2-4 short options
Example: Male | Female | Unisex
Vertical Layout
Display: Stacked
Best for: 3+ options, long option names
Example:
○ Standard Shipping (5-7 days)
○ Express (2-3 days)
○ Overnight (next day)
Grid Layout
Display: Multi-column grid
Best for: 4+ options with images or icons
Step 4: Set Default Selection
Choose which option is pre-selected when customers view the product:
Default Selection: Male
When to set defaults:
- ✅ Most popular choice
- ✅ Standard/basic option
- ✅ Free option (if others have charges)
- ✅ When one choice fits majority of customers
When NOT to set defaults:
- ❌ When you need explicit customer choice
- ❌ All options are equally important
- ❌ Forcing a selection prevents mistakes
Step 5: Add Pricing to Options
Each radio option can have its own price:
Male: +₼1.00
Female: +₼1.00
Unisex: No additional charge
Pricing strategies:
- Base option: $0 additional
- Premium options: Add upcharge
- Different costs: Reflect actual cost differences
- Free vs paid: Make free option clear
Price display formats:
Custom Format: (+{symbol}{price})
Example: (+$5.00)
Example: (+₼1.00)
The pricing automatically displays next to each option as shown in the screenshot.
Step 6: Required vs Optional
Make it required when:
- Customer MUST make a choice
- No default covers all scenarios
- Critical for fulfillment
Make it optional when:
- Default choice works for most
- Not essential to order
- Customer may prefer not to choose
Required: Yes (forces selection before checkout)
Required: No (default value used if not changed)
Advanced Features
Conditional Logic
Show/hide other options based on radio selection:
IF "Shipping Method" = "Express"
THEN show "Preferred Delivery Date"
Learn more: Conditional Logic
Dynamic Pricing
Each radio option can have:
- Fixed price addition (+$10)
- Percentage increase (+15%)
- Price subtraction (discount)
- No price change ($0)
Option Dependencies
Link radio selections to:
- Show/hide other fields
- Change available options elsewhere
- Modify pricing of other options
- Trigger validation rules
Image Options
Enhance radio buttons with images:
- Product color swatches
- Style previews
- Visual representation
- Better customer understanding
Best Practices
1. Limit Number of Options
Ideal: 2-5 options Maximum: 8 options (use dropdown beyond this)
Too many radio buttons:
- Overwhelm customers
- Take up too much space
- Slow decision making
2. Clear, Distinct Labels
Good labels:
- ✅ "Standard Shipping (5-7 business days)"
- ✅ "Men's Fit"
- ✅ "No Gift Wrapping"
Poor labels:
- ❌ "Option 1", "Option 2"
- ❌ "A", "B", "C"
- ❌ Unclear abbreviations
3. Show Pricing Clearly
Make costs obvious:
✅ Express Shipping (+$10.00)
✅ Premium Quality (+$15.00)
✅ Standard (Free)

❌ Express Shipping (check price at checkout)
❌ Premium Quality (extra)
4. Logical Order
Order options by:
- Most to least popular
- Least to most expensive
- Logical progression (Small → Large)
- Alphabetical (if no other logic)
5. Helpful Help Text
Explain when needed:
Help Text: "Select your size. If between sizes, we recommend sizing up."
6. Consider Default Impact
Defaults have high selection rates:
- 50-70% of customers keep defaults
- Set defaults strategically
- Use defaults for recommendations
- Don't default to expensive options without reason
Common Mistakes to Avoid
❌ Too Many Options
Problem: 15 radio buttons for country selection Solution: Use dropdown for long lists
❌ Unclear Differences
Problem: "Option A" vs "Option B" Solution: Use descriptive names showing difference
❌ Hidden Costs
Problem: Pricing not shown until checkout Solution: Display all pricing with options
❌ Wrong Default
Problem: Most expensive option pre-selected Solution: Default to most popular or standard option
❌ Using Checkboxes Instead
Problem: Checkboxes when only one choice allowed Solution: Radio buttons for single selection, checkboxes for multiple
❌ No Visual Feedback
Problem: Unclear which option is selected Solution: Use Button Group style with clear selection state
Styling & Display
Button Group Style
Modern button appearance:
- Clear selection state (filled background)
- Hover effects
- Mobile-friendly touch targets
- Pricing shown inline
- Professional look
Traditional Radio Style
Classic circular buttons:
- Familiar interface
- Compact display
- Works in all themes
- Accessibility built-in
Responsive Design
Radio options adapt to screen size:
- Horizontal on desktop (if space permits)
- Vertical on mobile (easier tapping)
- Touch-friendly targets (44x44px minimum)
- Clear spacing between options
Custom Styling
Match your brand:
- Theme colors automatically applied
- Custom CSS supported
- Font styling inherited
- Consistent with your store design
Integration with Orders
How Radio Options Appear in Orders
In Shopify order details:
Product: Custom T-Shirt
Options:
  - Select Fit: Male (+₼1.00)
  - Size: Large
  - Color: Blue
Order Export
Radio selections export with:
- Option label
- Selected value
- Price modifier
- Easy CSV processing
Fulfillment Systems
Radio data integrates with:
- Production systems
- Print-on-demand services
- Inventory management
- Shipping providers
Radio vs Other Option Types
Radio vs Dropdown
Use Radio when:
- 2-5 options
- Visual comparison helpful
- Quick selection important
- All options should be visible
Use Dropdown when:
- 6+ options
- Space is limited
- Options are familiar (countries, states)
- Visual comparison not needed
Radio vs Checkboxes
Use Radio when:
- Select ONLY ONE option
- Mutually exclusive choices
- "Choose one" scenario
Use Checkboxes when:
- Select MULTIPLE options
- Independent choices
- "Choose all that apply" scenario
Radio vs Buttons/Swatches
Both are similar! Button Group style IS essentially large, modern radio buttons.
SEO Benefits
Radio options improve SEO by:
- Structured product variations
- Better user experience
- Lower bounce rates
- Clearer product information
- Improved conversion signals
Troubleshooting
Default Selection Not Working
Cause: Default value doesn't match option value exactly Fix: Ensure exact spelling and case match
Can't Select Radio Button
Cause: Theme JavaScript conflict Fix: Check browser console for errors, contact support
Pricing Not Displaying
Cause: Price format configuration issue Fix: Verify price format settings in configuration
Mobile Layout Issues
Cause: Horizontal layout with too many options Fix: Switch to vertical layout or reduce options
Selection Not Saving
Cause: Form submission timing Fix: Ensure selection made before "Add to Cart"
Related Option Types
- Dropdown Options: For longer lists → Learn more
- Checkbox Options: For multiple selections → Learn more
- Color Options: For color swatches → Learn more
Next Steps
Now that you understand radio button options:
- Learn Conditional Logic to show options based on radio selection
- Explore Pricing Variants to understand dynamic pricing
- Try Button Group styling for modern appearance
Get Started with Optionify
Ready to add professional radio button options to your Shopify store? Install Optionify today from the Shopify App Store and start offering size selections, style choices, and service options in minutes.
Install Optionify on Shopify App Store
With Optionify's radio button options, you can:
- Create single-choice selections with modern button styles
- Add individual pricing to each option
- Set default selections to guide customers
- Choose between horizontal, vertical, or grid layouts
- Integrate seamlessly with your store design
Join thousands of Shopify merchants who trust Optionify for flexible product options and customization.
Need help? Check our Troubleshooting Guide or contact support